|
At the July SCPCUG Monthly Meeting our resident Guru David
Nottingham showed us the roll Windows XP plays in making
Digital Photography easier. One of the new features offered by
Windows XP and demonstrated by David was the batch renaming of
the JPEG photo files from a digital camera. More than a few of
the audience members were impressed by this. Well those of you,
like me, that have not yet moved to Windows XP can take heart.
We too can do the same and even more by using a program I have
mentioned several times in this column, IrfanView (http://www.irfanview.com).
If you have not installed this free for personal use program
yet, you are doing yourself a real disservice. I first reviewed
IrfanView in my June 2000 Web Master Wanderings column (http://www.scpcug.com/wmwand17.html).
With each new update IrfanView has more features and gets better.
The current release is version 3.75 dated July 15, 2002. The
basic program is a 812 KB download that unzips to 1.20 MB. But
to really take advantage of all IrfanView has to offer you need
to download the all_plugins file which is a 3.35 MB download
and unzips to 4.45 MB.
Later I will walk you through how to do batch renaming and
conversions with IrfanView but first a little background. Digital
cameras are capable of taking many photos which are usually saved
to some form of memory. I have a Veo Capture 1300 1.3 Megapixel
Digital Camera (http://www.veo.com/Capture1300/capture.asp).
What you never heard of the name Veo? Neither did I until I bought
this camera. Burdines Department Store was offering the camera
as a promotional item around Christmas. The manufacturer's suggested
retail price is $99.99. Burdines kept reducing the price to clear
out their inventory. Finally, I could no longer resist. I got
the camera with a great 3-program Arcsoft software bundle for
only $42.50. Have not seen a 1.3 Megapixel camera with similar
features (like a 1.5" LCD color view screen) near that price
since. But I digress--back to my story! My camera has eight Megabytes
of SDRAM internal memory but also allows for installation of
CompactFlash cards (removable memory). I normally use a 64 MB
CompactFlash card which allows for the storing of over 120 photos
at the best compression setting and highest resolution (1248
x 960 pixels). As with all digital cameras the photos are stored
in numerical order. In my case the automatic naming starts with
VEO_0001.jpg and numerically progresses up (VEO_0002, VEO_0003,
etc.) as more photos are taken. Such nondescript automatic naming
of photos can cause a bit of work when hundreds of photos are
involved. Most people want a more descriptive file name. At the
very least one might want to group photos according to subject
matter, location, or date.
To avoid having to rename each file individually, batch renaming
is needed. IrfanView offers this feature. After opening IrfanView
click on File. In the resulting dropdown menu, click on
Batch Conversion/Rename. This brings up the Batch conversion
screen.

On the right, under Work as, select the Batch rename
radio button. Using the dropdown arrow next to the Look in
window, browse to the location on your hard drive where you have
“work” copies of your camera numbered photos stored.
To prevent inadvertent loss always use duplicate (work) copies
of your camera originals. Now you can add either selected photos
(by individually highlighting them) or all photos to the Input
files window on the left by clicking the Add or Add
all buttons respectively. Deciding on which photos to add
selectively is made easy by using the Preview image window
at the bottom left. You can also change the sequence of the files
being renamed by using the Move up and Move down
buttons.
Now that we have our Input files selected, click on the Set
rename options button near the bottom. A Batch rename
settings screen pops up allowing you to select a Name
pattern and Starting index number.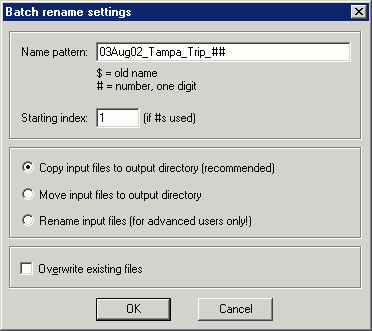 Here is where one
decides how to categorize the photos. For illustration purposes,
I took a small group of photos originally labeled VEO_0001 through
VEO_0008 minus the VEO_0005 photo (not added to the Input
files window). In the Name pattern window I typed
in 03Aug02_Tampa_Trip_##. In the Starting index
window I typed in 1. I next clicked the OK button
which brought me back to the Batch conversion screen.
Clicking on the Start button started the renaming process
which took less than a second. When completed, I got a Batch
conversion done screen showing the input and output file
paths. This screen would also show any errors or warnings if
there were any. In this example the output files are now located
in the C:\Temp directory. The seven JPG files are renamed and
renumbered 03Aug02_Tampa_Trip_01 through 03Aug02_Tampa_Trip_07. Here is where one
decides how to categorize the photos. For illustration purposes,
I took a small group of photos originally labeled VEO_0001 through
VEO_0008 minus the VEO_0005 photo (not added to the Input
files window). In the Name pattern window I typed
in 03Aug02_Tampa_Trip_##. In the Starting index
window I typed in 1. I next clicked the OK button
which brought me back to the Batch conversion screen.
Clicking on the Start button started the renaming process
which took less than a second. When completed, I got a Batch
conversion done screen showing the input and output file
paths. This screen would also show any errors or warnings if
there were any. In this example the output files are now located
in the C:\Temp directory. The seven JPG files are renamed and
renumbered 03Aug02_Tampa_Trip_01 through 03Aug02_Tampa_Trip_07.
While the batch renaming that IrfanView offers is a nice time
saver, it is the batch conversion that really makes my day. Let
us now look at that. Again, selecting Batch Conversion/Rename
from the File dropdown menu brings up the same Batch
conversion screen. This time however, under Work as,
select the Batch conversion radio button. The process
for selecting the input files is the same as for batch renaming.
Now, under Batch conversion settings select the Output
format. The Output format dropdown arrow provides
a choice of 16 different graphic formats. Pressing the Options
button will give you appropriate options for the selected output
format. For example, when I output to the JPEG format I usually
select a compression Quality setting of 85. For a TIF
output I either select None or LZW for the TIFF
Save Compression depending upon my expected use of the output
file. If I am printing the photo, I select None. If I
am e-mailing the TIF photo, I select LZW.
We could now press the Start button and IrfanView in
a second or two would convert the batch of selected files from
one graphic format to another. But the “real meat”
of the batch conversion process is in using the advanced options.
Placing a check mark in front of Use advanced options
activates the Set advanced options button. Pressing that
button brings up the Set for all images screen. Here you
have a vast array of changes that will be made to all photos
in the batch.
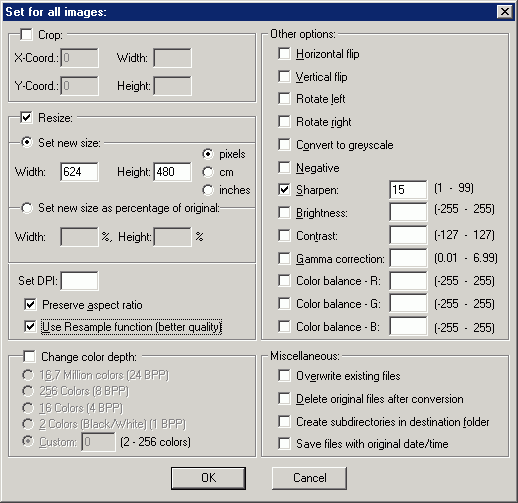
I use this for resizing down a batch of photos from my camera
originals of 1248 x 960 pixels to a more reasonable 624 x 480
pixels for e-mail attachments. Using the previously mentioned
compression Quality setting of 85 results in an original 455
KB file size being reduced to 82 KB.
Another thing to keep in mind is that when you resize photos
(or graphics), the resulting image usually looks slightly blurry.
After doing a resize on a single (test) image, I can then decide
on how much sharpness to add for the batch by sharpening the
test image at several values and viewing the result. It's a subjective
thing requiring trial and error. Only you can decide how much
sharpness is enough.
The default sharpen setting in IrfanView is 20 with a range
of one to 99. To set sharpness in IrfanView, load your photo
and go to Image | Effects | Effects Browser. You are now
looking at 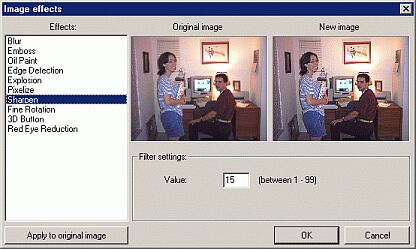 the
Image effects screen. Select Sharpen and you will
see a before and after comparison of your photo along with the
Sharpen Filter settings Value. The before and after thumbnail
photos may not be large enough to get a good sense of the result.
In that case, pick a sharpen Value and click the Apply
to original image button. If you don't like the result go
to Edit and click Undo. Now go through the same
process again until you are happy with the result. I find a sharpen
value of 15 usually works for me in resizing from 1248 x 960
to 624 x 480 pixels. the
Image effects screen. Select Sharpen and you will
see a before and after comparison of your photo along with the
Sharpen Filter settings Value. The before and after thumbnail
photos may not be large enough to get a good sense of the result.
In that case, pick a sharpen Value and click the Apply
to original image button. If you don't like the result go
to Edit and click Undo. Now go through the same
process again until you are happy with the result. I find a sharpen
value of 15 usually works for me in resizing from 1248 x 960
to 624 x 480 pixels.
I have walked you through only two of the items you can do
with batch conversion under Set advanced options. Size
reduction and sharpening are the two I find most useful. But
if you look at the Set for all images screen you can see
there are many more items that can be selected and explored such
as changing the brightne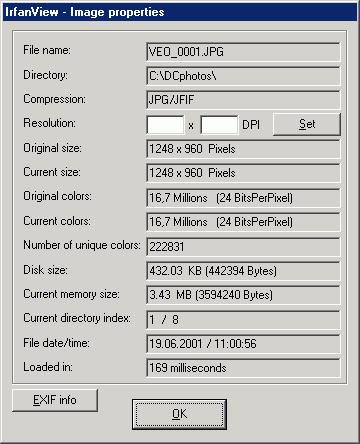 ss,
contrast, color depth, DPI (Dots Per Inch), etc. ss,
contrast, color depth, DPI (Dots Per Inch), etc.
Let us now move on to a feature of digital cameras that you
may not even be aware of. Did you know that each of the photos
saved in your digital camera's memory may contain information
about your camera, how the photo was taken, and when it was taken?
If present, IrfanView will uncover this information for you.
Load a camera original photo into IrfanView and go to Image
| Information. Up pops a screen called Image properties
which has information as to size in pixels, color depth, file
size, etc. IrfanView will give you
this type of info for any image. But if your digital camera manufacturer
has included image information within the saved photo you should
see a button called EXIF info. (EXIF stands for Exchangeable
Image File Format.)
Clicking the EXIF info button brings up the EXIF
information screen with a large list of info that will vary
by manufacturer and camera model. From this you can tell things
like what camera make 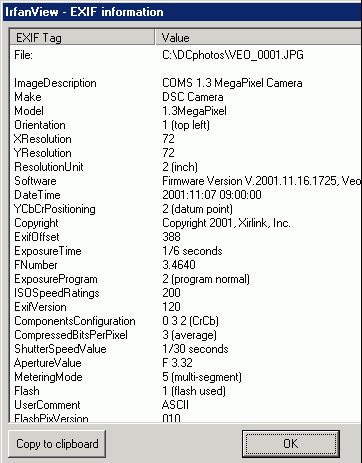 and
model took the photo, what firmware was used within the camera,
resolution, exposure time, shutter speed, if a flash was used,
etc. If your digital camera has a built-in clock it will give
you the date and time the photo was taken. My camera does not
have an internal clock so what I get is apparently the date and
time of the last firmware revision. and
model took the photo, what firmware was used within the camera,
resolution, exposure time, shutter speed, if a flash was used,
etc. If your digital camera has a built-in clock it will give
you the date and time the photo was taken. My camera does not
have an internal clock so what I get is apparently the date and
time of the last firmware revision.
EXIF information could be very useful in deciding which digital
camera to buy. It gives you a “real” peek as to what
is under a fancy camera exterior. The trick is one would need
an original saved photo from each camera of interest so that
a comparison of the EXIF information could be made.
To learn more about EXIF go to EXIF.org at http://www.exif.org/.
The Exchangeable Image File Format is a standard for storing
interchange information in image files, especially those using
JPEG compression. Most digital cameras now use the EXIF format.
The format is part of a standard to encourage interoperability
between imaging devices. At EXIF.org you will find a forum, sample
images with EXIF marker sections, programs, specifications, and
proposals. Currently under programs only one program is listed.
It is a free program called Photo Studio available at
http://www.stuffware.co.uk/.
Photo Studio is a multi-purpose image management tool with full
EXIF support. It is a useful tool for examining and manipulating
the contents of additional data stored along with your images.
It even allows for adding comments to your stored image which
IrfanView will then recognize with an added JPEG Comment
button on the Image properties screen. Note that Photo
Studio is under development and currently has no Help file within
the program. However, the Help file is available in HTML format
from the Photo Studio web site.
With respect to EXIF information, IrfanView now has an important
additional capability that previous versions did not. This new
capability may not be immediately obvious. When you resave your
camera original photo after processing in IrfanView (cropping,
resizing, sharpening, etc.) the EXIF information will now be
saved with your new image. The option of resaving your processed
image with the original date/time is also available.
After you have processed your digital photos in IrfanView
you might want to display them on your computer screen as a slideshow.
IrfanView has this capability. You can even play music in the
background by first loading a music file such as a MIDI, MP3,
or even a MP3 playlist (.M3U). Once the music starts playing,
you load and start the slideshow. I will let you explore that
on your own as the slideshow screen for loading the photos is
similar to the batch conversion screen . As is usual with IrfanView
there are many options to choose from. So just go to File
| Slideshow and have fun.
Note: Web Master Wanderings
articles contain links to external web sites. Web addresses are
constantly changing. There is no guarantee that the information
links provided in this article will remain unbroken or up-to-date
beyond the date that this article is originally published. |